Deploying and Managing IOC Instances#
Introduction#
This tutorial will show you how to deploy and manage the example IOC Instance
that came with the template beamline repository.
You will need to have your own bl01t beamline repository
from the previous tutorial.
For these early tutorials we are not using Kubernetes and instead are deploying
IOCs to the local docker or podman instance. So for these tutorials we
shall pretend that your workstation is one of the IOC servers on the fictitious
beamline BL01T.
Continuous Integration#
Before we change anything, we shall make sure that the beamline repository CI is working as expected. To do this go to the following URL (make sure you insert your GitHub account name where indicated):
https://github.com/YOUR_GITHUB_ACCOUNT/bl01t/actions
You should see something like the following:
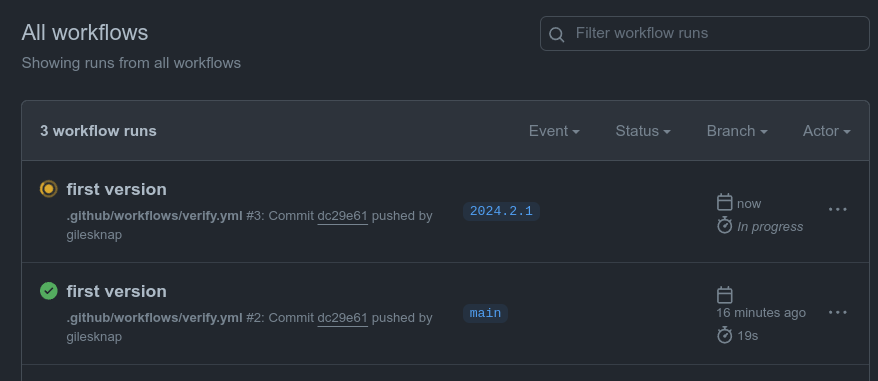
the GitHub Actions page for the example beamline repository#
This is a list of all the Continuous Integration (CI) jobs that have been
executed (or are executing) for your beamline repository. There should be
two jobs listed, one for when you pushed the main branch and one for when you
tagged with the CalVer version number.
If you click on the most recent job you can drill in and see the steps that
were executed. The most interesting step is Run IOC checks. This
is executing the script .github/workflows/ci_verify.sh. This goes through
each of the IOC Instances in the services folder and checks that they
have valid configuration.
For the moment just check that your CI passed and if not review that you have followed the instructions in the previous tutorial correctly.
Set up Environment for BL01T Beamline#
The standard way to set up your environment for any ec services repository is to get the environment.sh script from the domain repository and source it.
Start this section of the tutorial inside the vscode project that you created in the previous tutorial. Make sure you have a terminal open and the current working directory is your bl01t project root folder.
First make sure you have the local binaries folder in your path by adding
the following to the end of your $HOME/.bash_profile file:
export PATH="$PATH:~/.local/bin"
Then follow these steps (make sure you insert your GitHub account name where indicated):
# make sure we have the path setup from the bash_profile
source ~/.bash_profile

mkdir -p ~/.local/bin
# make a copy of the environment.sh script named after the beamline
cp environment.sh ~/.local/bin/bl01t
source bl01t
Once you have done this and logged out and back in again to pick up your new
profile you should be able to enable the bl01t environment as follows:
# first make sure you have loaded your virtual environment for the ec tool
source $HOME/ec-venv/bin/activate # DLS users don't need this step
source bl01t
Deploy the Example IOC Instance#
For this section we will be making use of the epics-containers-cli tool.
This command line entry point for the tool is ec. For more
details see: Command Line Interface for IOC Management or try ec --help.
The simplest command to check that the tool is working is ps which lists
the IOC Instances that are currently running:
ec ps
You should see no IOCs listed as you have not yet started an IOC Instance.
The following command will deploy the example IOC instance to your local machine (unless you have skipped ahead and set up your Kubernetes config in which case the same command will deploy to your Kubernetes cluster).
cd bl01t # (if you are not already in your beamline repo)
ec deploy-local services/bl01t-ea-test-01
You will be prompted to say that this is a TEMPORARY deployment. This is because we are deploying directly from the local filesystem. You should only use this for testing purposes because there is no guarantee that you could ever roll back to this version of the IOC (as it is lost as soon as filesystem changes are made). Local filesystem deployments are given a beta version number to indicate that they are not permanent.
You can now see the beta IOC instance running with:
$ ec ps
| name             | version       | running | restarts | deployed            |
|------------------|---------------|---------|----------|---------------------|
| bl01t-ea-test-01 | 2024.3.8e8b-b | true    | 0        | 2024-03-19 10:08:15 |
At the end of the last tutorial we tagged the beamline repository with a
CalVer version number and pushed it up to GitHub. This means that we
can now use that tagged release of the IOC instance. First let’s
check that the IOC instance version is available as expected. The following
command lists all of the tagged versions of the IOC instance that are
available in the GitHub repository.
$ ec instances bl01t-ea-test-01
| version  |
|----------|
| 2024.3.1 |
Note
The above command is the first one to look at your github repository. This is how it finds out the versions of the IOC instance that are available. If you get an error it may be because you set EC_SERVICES_REPO incorrectly in environment.sh. Check it and source it again to pick up any changes.
Hint
ec supports command line completion, which means that entering <tab> <tab> will give hints on the command line:
$ ec <tab> <tab>
attach        deploy        exec          list          logs          start         template
delete        deploy-local  instances     log-history   restart       stop          validate
$ ec instances b<tab> <tab>
$ ec instances bl01t-ea-ioc-01
To enable this behavior in your shell run the command ec --install-completion
Now that we know the latest version number we can deploy a release version. This command will extract the IOC instance using the tag from GitHub and deploy it to your local machine:
$ ec deploy bl01t-ea-test-01 2024.3.1
bdbd155d437361fe88bce0faa0ddd3cd225a9026287ac5e73545aeb4ab3a67e9

$ ec ps -w
| name             | version  | running | restarts | deployed            | image                                                             |
|------------------|----------|---------|----------|---------------------|-------------------------------------------------------------------|
| bl01t-ea-test-01 | 2024.3.1 | true    | 0        | 2024-03-19 11:10:53 | ghcr.io/epics-containers/ioc-adsimdetector-linux-runtime:2024.2.1 |
IMPORTANT: deploy-local vs deploy#
Be aware of the distinction of deploy-local vs deploy. Both of these commands create a running instance of the IOC in the target environment (currently your local machine - later on a Kubernetes Cluster). However, deploy-local gets the IOC instance description YAML direct from your local filesystem. This means it is not likely to be available for re-deployment later on. deploy gets the IOC instance description YAML from the GitHub repository with a specific tag and therefore is a known state that can be recovered at a later date.
Always strive to have released versions of IOC instances deployed in your
environments. deploy-local is only for temporary testing purposes.
Managing the Example IOC Instance#
Starting and Stopping IOCs#
To stop / start the example IOC try the following commands. Note that
ec ps -a shows you all IOCs including stopped ones.
ec ps -a
ec stop bl01t-ea-test-01
ec ps -a
ec start bl01t-ea-test-01
ec ps
Note
Generic IOCs.
You may have noticed that the IOC instance has is showing that it has
an image ghcr.io/epics-containers/ioc-adsimdetector-linux-runtime:2024.2.1.
This is a Generic IOC image and all IOC Instances must be based upon one of these images. This IOC instance has no startup script and is therefore not functional, it could have been based on any Generic IOC.
Monitoring and interacting with an IOC shell#
To attach to the IOC shell you can use the following command. HOWEVER, this will attach you to nothing in the case of this example IOC as it has no shell. In the next tutorial we will use this command to interact with iocShell.
ec attach bl01t-ea-test-01
Use the command sequence ctrl-P then ctrl-Q to detach from the IOC. However,
there are issues with both VSCode and IOC shells capturing ctrl-P. until
this is resolved it may be necessary to close the terminal window to detach.
You can also restart and detach from the IOC using ctrl-D or ctrl-C, or
by typing exit.
To run a bash shell inside the IOC container:
ec exec bl01t-ea-test-01
Once you have a shell inside the container you could inspect the following folders:
ioc code |
/epics/ioc |
support modules |
/epics/support |
EPICS binaries |
/epics/epics-base |
IOC instance config |
/epics/ioc/config |
IOC startup script |
/epics/runtime |
Being at a terminal prompt inside the IOC container can be useful for debugging and testing. You will have access to caget and caput, plus other EPICS tools, and you can can inspect files such as the IOC startup script.
Logging#
To get the current logs for the example IOC:
ec logs bl01t-ea-test-01
Or follow the IOC log until you hit ctrl-C:
ec logs bl01t-ea-test-01 -f
You should see the log of ibek loading and generating the IOC startup assets and then the ioc shell startup script log.
You can also attach to the IOC and check that it has started correctly by using the ‘dbl’ command to list all the records in it’s IOC database.
ec attach bl01t-ea-test-01
dbl
# ctrl-p ctrl-q to detach