Kubernetes Additional How To’s#
Install the Kubernetes Dashboard#
The dashboard gives you a nice GUI for exploring and controlling your cluster. It is very useful for new users to get an understanding of what Kubernetes has to offer.
These commands should be run after you have set up your Kubernetes cluster and setup the environment variables as described in Setup a Kubernetes Server.
Execute this on your workstation:
GITHUB_URL=https://github.com/kubernetes/dashboard/releases
VERSION_KUBE_DASHBOARD=$(curl -w '%{url_effective}' -I -L -s -S ${GITHUB_URL}/latest -o /dev/null | sed -e 's|.*/||')
kubectl create -f https://raw.githubusercontent.com/kubernetes/dashboard/${VERSION_KUBE_DASHBOARD}/aio/deploy/recommended.yaml
Then create the admin user and role by executing the following:
kubectl apply -f - <<EOF
apiVersion: v1
kind: ServiceAccount
metadata:
  name: admin-user
  namespace: kubernetes-dashboard
---
apiVersion: rbac.authorization.k8s.io/v1
kind: ClusterRoleBinding
metadata:
  name: admin-user
roleRef:
  apiGroup: rbac.authorization.k8s.io
  kind: ClusterRole
  name: cluster-admin
subjects:
- kind: ServiceAccount
  name: admin-user
  namespace: kubernetes-dashboard
EOF
Get a token for the user and copy the token into your clipboard.
On k3s v1.24 and newer:
kubectl -n kubernetes-dashboard create token admin-user
Use kubectl to start a proxy that will forward HTTP requests to your cluster:
kubectl proxy &
Finally, browse to Dashboard Screen URL and paste the Token that you copied above:
Installing on a Raspberry Pi#
Raspberry Pi3 and Pi4 can run the k3s server. The more memory installed the better.
NOTE: the developer container is not supported on the Raspberry Pi yet, so you can run the k3s server on the Pi, but you will need to run the client tools on a separate linux or Windows workstation. ALSO: you would need to compile IOC containers for the arm64 architecture. TODO: provide documentation on how to do this.
For a Raspberry Pi you need a couple of extra settings to get K3S running:
sudo update-alternatives --set iptables /usr/sbin/iptables-legacy
# edit /boot/cmdline and make sure the single line contains:
#  cgroup_memory=1 cgroup_enable=memory
sudo reboot
Installing on Windows Subsystem for Linux#
WSL2 gives you a linux distribution running within Windows, the following additional instructions explain how to use this platform.
Install k3s server#
First you need Windows 10 OS build 20262 or higher. Then follow the WSL2 instructions. When installing the linux distribution, choose Ubuntu.
Start a new WSL2 Window and bring up the k3s server as follows:
wget https://github.com/k3s-io/k3s/releases/download/v1.21.2%2Bk3s1/k3s
sudo install -o root -g root -m 0755 k3s /usr/local/bin/k3s
sudo k3s server
There are no services in WSL so this k3s server will run in the foreground. You need to start a second WLS window to continue as follows:
mkdir .kube
sudo cp /etc/rancher/k3s/k3s.yaml .kube/config
sudo chown giles .kube/config
Get X11 GUI to Work with WSL#
Update: if you have Windows 11 you can use the new WSL GUI support as described in WSL GUI Support. Essentially, if you have Windows 11 and installed WSL2, X11 GUI apps should work out of the box.
When you come to launch the GUI later on you will need some additional steps as follows.
First you will need install docker for WSL.
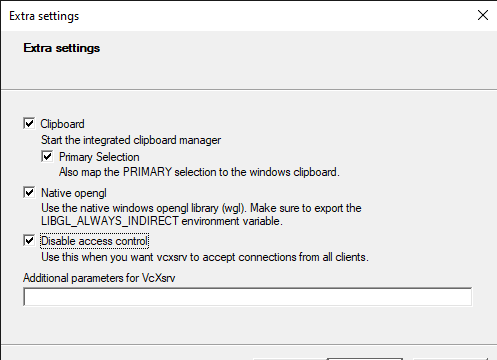
You will also require an X11 Server for Windows. When you run the server choose the option Disable Access Control as follows:
The networking for docker on WSL will not broadcast between containers so you need to use EPICS_CA_ADDR_LIST to get edm to see the example IOC PVs. To do this perform the following steps to get the name of the example IOC pod and discover its IP address, then pass that to the edm container:
cd to the root of the project you created in Deploying and Managing IOC Instances, then:
kubectl get pods
    NAME                      READY   STATUS    RESTARTS   AGE
    example-6779d4dcf-g2cpm   1/1     Running   2          19h

kubectl exec -it example-6779d4dcf-g2cpm -- busybox ifconfig eth0
    eth0      Link encap:Ethernet  HWaddr 70:85:C2:DB:70:96
              inet addr:192.168.86.33  Bcast:192.168.86.255  Mask:255.255.255.0

export DISPLAY=$(awk '/nameserver / {print $2; exit}' /etc/resolv.conf 2>/dev/null):0
export LIBGL_ALWAYS_INDIRECT=1

# IP ADDRESS from above kubectl command
./opi/stexample-gui.sh -e EPICS_CA_ADDR_LIST=192.168.86.33